HARIO COLD BREW BOTTLE
A chic & convenient bottle - ideal for those who want to get things done quickly and make their own cold brew like a pro. Watch video here.
Parts

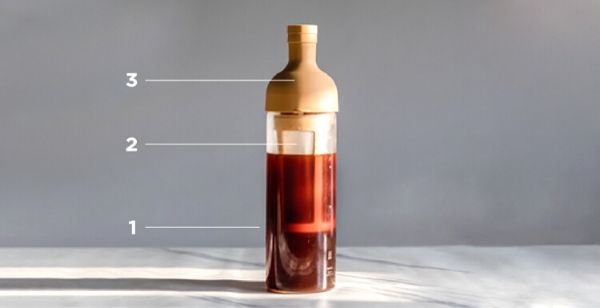
The Hario Cold Brew bottle consists of three main parts:
- The Glass Bottle
- The Filter
- The Silicone Rubber Spout & Stopper
The filter has a top portion which twists into the rubber spout and is then attached to the top of the glass bottle. In this immersion technique, the filter, designed to hold the coffee is immersed into the glass bottle containing water, and stored in a refrigerator for 12-15 hours to facilitate the brewing process.
Ingredients
- 650 ml Filtered Water (cold or room temperature)
- 8 levelled tbsp (55g) ARAKU Micro Climate (coarse grind)
Process
Scoop out 8 levelled tbsp (55g) of ARAKU Micro Climate - coarse grind.
Detach the top portion of the filter and fill it with coffee.
Twist the filter into the top of the rubber spout and attach the rubber spout to the glass bottle base.
Remove the stopper from the spout.
Through the spout, pour 650 ml of cold filtered water into the glass bottle or until the top square mark.
Place the stopper back onto the spout.
Shake gently to wet all the coffee grounds.
Keep the Hario glass bottle in the refrigerator for at least 12-15 hours (we recommend overnight) and only take it out once the recommended time has passed.
Shake gently to stir the brew.
Twist the silicone rubber spout to remove the filter.
Detach the filter from the spout and put the spout back onto the glass bottle base.
Pour yourself a glass of delicious Araku cold brew and top it up with lots of ice!
